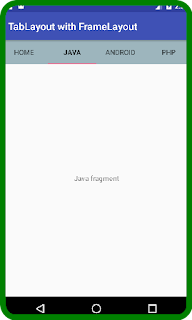
Android TabLayout dengan FrameLayout
September 10, 2020
Add Comment
Di halaman sebelumnya, kami membuat tab geser menggunakan TabLayout dan ViewPager. Di sini, kita akan membuat tab non geser menggunakan TabLayout dan FrameLayout.
Item TabLayout diimplementasikan dengan menambahkan TabItem widget desain dukungan android.
Buat file activity.xml dengan komponen tampilan TabLayout dan FrameLayout. File : activity.xml
File : MainActivity.java
Sekarang buat file fragmen yang berbeda untuk semua tab yang berbeda. File : HomeFragment.java
File : fragment_home.xml
File : JavaFragment.java
File : fragment_java.xml
File : AndroidFragment.java
File : fragment_android.xml
File : PhpFragment.java
File : fragment_php.xml
File : strings.xml
Contoh TabLayout menggunakan FrameLayout
Mari kita membuat contoh TabLayout menggunakan FrameLayout dan Fragment.* build.gradle
Sekarang memberi pustaka dependensi TabLayout di file build.gradle.implementation 'com.android.support:design:26.1.0'
Buat file activity.xml dengan komponen tampilan TabLayout dan FrameLayout. File : activity.xml
<?xml version="1.0" encoding="utf-8"?>
<android.support.constraint.ConstraintLayout xmlns:android="http://schemas.android.com/apk/res/android"
    xmlns:app="http://schemas.android.com/apk/res-auto"
    xmlns:tools="http://schemas.android.com/tools"
    android:layout_width="match_parent"
    android:layout_height="match_parent"
    tools:context="tablayout.example.com.tablayoutwithframelayout.MainActivity">


    <android.support.design.widget.TabLayout
        android:id="@+id/tabLayout"
        android:layout_width="match_parent"
        android:layout_height="wrap_content"
        android:background="#7367">

        <android.support.design.widget.TabItem
            android:layout_width="wrap_content"
            android:layout_height="wrap_content"
            android:text="Home" />

        <android.support.design.widget.TabItem
            android:layout_width="wrap_content"
            android:layout_height="wrap_content"
            android:text="Java" />

        <android.support.design.widget.TabItem
            android:layout_width="wrap_content"
            android:layout_height="wrap_content"
            android:text="Android" />

        <android.support.design.widget.TabItem
            android:layout_width="wrap_content"
            android:layout_height="wrap_content"
            android:text="Php" />
    </android.support.design.widget.TabLayout>

    <FrameLayout
        android:id="@+id/frameLayout"
        android:layout_width="match_parent"
        android:layout_height="455dp"
        app:layout_constraintEnd_toEndOf="parent"
        app:layout_constraintStart_toStartOf="parent"
        app:layout_constraintTop_toBottomOf="@+id/tabLayout">

    </FrameLayout>
</android.support.constraint.ConstraintLayout>
File : MainActivity.java
package tablayout.example.com.tablayoutwithframelayout;

import android.support.design.widget.TabLayout;
import android.support.v4.app.Fragment;
import android.support.v4.app.FragmentManager;
import android.support.v4.app.FragmentTransaction;
import android.support.v7.app.AppCompatActivity;
import android.os.Bundle;
import android.widget.FrameLayout;

public class MainActivity extends AppCompatActivity {
    TabLayout tabLayout;
    FrameLayout frameLayout;
    Fragment fragment = null;
    FragmentManager fragmentManager;
    FragmentTransaction fragmentTransaction;
    @Override
    protected void onCreate(Bundle savedInstanceState) {
        super.onCreate(savedInstanceState);
        setContentView(R.layout.activity_main);

        tabLayout=(TabLayout)findViewById(R.id.tabLayout);
        frameLayout=(FrameLayout)findViewById(R.id.frameLayout);

        fragment = new HomeFragment();
        fragmentManager = getSupportFragmentManager();
        fragmentTransaction = fragmentManager.beginTransaction();
        fragmentTransaction.replace(R.id.frameLayout, fragment);
        fragmentTransaction.setTransition(FragmentTransaction.TRANSIT_FRAGMENT_OPEN);
        fragmentTransaction.commit();

        tabLayout.addOnTabSelectedListener(new TabLayout.OnTabSelectedListener() {
            @Override
            public void onTabSelected(TabLayout.Tab tab) {
               // Fragment fragment = null;
                switch (tab.getPosition()) {
                    case 0:
                        fragment = new HomeFragment();
                        break;
                    case 1:
                        fragment = new JavaFragment();
                        break;
                    case 2:
                        fragment = new AndroidFragment();
                        break;
                    case 3:
                        fragment = new PhpFragment();
                        break;
                }
                FragmentManager fm = getSupportFragmentManager();
                FragmentTransaction ft = fm.beginTransaction();
                ft.replace(R.id.frameLayout, fragment);
                ft.setTransition(FragmentTransaction.TRANSIT_FRAGMENT_OPEN);
                ft.commit();
            }

            @Override
            public void onTabUnselected(TabLayout.Tab tab) {

            }

            @Override
            public void onTabReselected(TabLayout.Tab tab) {

            }
        });

    }
}
Sekarang buat file fragmen yang berbeda untuk semua tab yang berbeda. File : HomeFragment.java
package tablayout.example.com.tablayoutwithframelayout;

import android.os.Bundle;
import android.support.v4.app.Fragment;
import android.view.LayoutInflater;
import android.view.View;
import android.view.ViewGroup;

public class HomeFragment extends Fragment {

    public HomeFragment() {
        // Required empty public constructor
    }

    @Override
    public View onCreateView(LayoutInflater inflater, ViewGroup container,
                             Bundle savedInstanceState) {
        // Inflate the layout for this fragment
        return inflater.inflate(R.layout.fragment_home, container, false);
    }

}
File : fragment_home.xml
<FrameLayout xmlns:android="http://schemas.android.com/apk/res/android"
    xmlns:tools="http://schemas.android.com/tools"
    android:layout_width="match_parent"
    android:layout_height="match_parent"
    tools:context="tablayout.example.com.tablayoutwithframelayout.HomeFragment">

    <!-- TODO: Update blank fragment layout -->
    <TextView
        android:layout_width="match_parent"
        android:layout_height="match_parent"
        android:gravity="center"
        android:text="@string/home_fragment" />

</FrameLayout>
File : JavaFragment.java
package tablayout.example.com.tablayoutwithframelayout;

import android.os.Bundle;
import android.support.v4.app.Fragment;
import android.view.LayoutInflater;
import android.view.View;
import android.view.ViewGroup;

public class JavaFragment extends Fragment {

    public JavaFragment() {
        // Required empty public constructor
    }

    @Override
    public View onCreateView(LayoutInflater inflater, ViewGroup container,
                             Bundle savedInstanceState) {
        // Inflate the layout for this fragment
        return inflater.inflate(R.layout.fragment_java, container, false);
    }

}
File : fragment_java.xml
<FrameLayout xmlns:android="http://schemas.android.com/apk/res/android"
    xmlns:tools="http://schemas.android.com/tools"
    android:layout_width="match_parent"
    android:layout_height="match_parent"
    tools:context="tablayout.example.com.tablayoutwithframelayout.JavaFragment">

    <!-- TODO: Update blank fragment layout -->
    <TextView
        android:layout_width="match_parent"
        android:layout_height="match_parent"
        android:gravity="center"
        android:text="@string/java_fragment" />

</FrameLayout>
File : AndroidFragment.java
package tablayout.example.com.tablayoutwithframelayout;

import android.os.Bundle;
import android.support.v4.app.Fragment;
import android.view.LayoutInflater;
import android.view.View;
import android.view.ViewGroup;

public class AndroidFragment extends Fragment {

    public AndroidFragment() {
        // Required empty public constructor
    }

    @Override
    public View onCreateView(LayoutInflater inflater, ViewGroup container,
                             Bundle savedInstanceState) {
        // Inflate the layout for this fragment
        return inflater.inflate(R.layout.fragment_android, container, false);
    }

}
File : fragment_android.xml
<FrameLayout xmlns:android="http://schemas.android.com/apk/res/android"
    xmlns:tools="http://schemas.android.com/tools"
    android:layout_width="match_parent"
    android:layout_height="match_parent"
    tools:context="tablayout.example.com.tablayoutwithframelayout.AndroidFragment">

    <!-- TODO: Update blank fragment layout -->
    <TextView
        android:layout_width="match_parent"
        android:layout_height="match_parent"
        android:gravity="center"
        android:text="@string/android_fragment" />

</FrameLayout>
File : PhpFragment.java
package tablayout.example.com.tablayoutwithframelayout;

import android.os.Bundle;
import android.support.v4.app.Fragment;
import android.view.LayoutInflater;
import android.view.View;
import android.view.ViewGroup;

public class PhpFragment extends Fragment {

    public PhpFragment() {
        // Required empty public constructor
    }

    @Override
    public View onCreateView(LayoutInflater inflater, ViewGroup container,
                             Bundle savedInstanceState) {
        // Inflate the layout for this fragment
        return inflater.inflate(R.layout.fragment_php, container, false);
    }

}
File : fragment_php.xml
<FrameLayout xmlns:android="http://schemas.android.com/apk/res/android"
    xmlns:tools="http://schemas.android.com/tools"
    android:layout_width="match_parent"
    android:layout_height="match_parent"
    tools:context="tablayout.example.com.tablayoutwithframelayout.PhpFragment">

    <!-- TODO: Update blank fragment layout -->
    <TextView
        android:layout_width="match_parent"
        android:layout_height="match_parent"
        android:gravity="center"
        android:text="@string/php_fragment" />

</FrameLayout>
File : strings.xml
<resources>
    <string name="app_name">TabLayout with FrameLayout</string>

    <!-- TODO: Remove or change this placeholder text -->
    <string name="home_fragment">Home fragment</string>
    <string name="java_fragment">Java fragment</string>
    <string name="android_fragment">Android fragment</string>
    <string name="php_fragment">Php fragment</string>
</resources>

0 Response to "Android TabLayout dengan FrameLayout"
Posting Komentar